

An American woman whose $30,000 (£23,000) wedding was cancelled has hosted the homeless at her banquet rather than let it all go to waste.
The wedding reception of Sarah Cummins, 25, had been booked at the plush Ritz Charles in Carmel, Indiana, and was non-refundable.So she contacted homeless shelters in the area and guests were bussed in for Saturday's 170-seat dinner. Ms Cummins called off the wedding but has not given the reasons.
Monday 31 July 2017
Thursday 27 July 2017
Wednesday 26 July 2017
µTorrent Pro - μTorrent® (uTorrent) - a (very) tiny BitTorrent client

Like / Share / Subscribe and comment
 to view the file @ your mail
________
Wednesday 19 July 2017
How To Fix High RAM and CPU Usage of Windows 10 System (ntoskrnl.exe) Process
Today, I’m here to tell about a bug in Windows 10 that is worrying the Windows 10 users and they are voicing their problem on Reddit and Microsoft’s forums. According to them, some processes (actually ntoskrnl.exe Windows 10) in Windows 10 are slowing down the OS by consuming tons of RAM and CPU power.
The main process that is being observed as troublesome is the System (ntoskrnl.exe) process. Reportedly, this process uses an increasing amount of RAM after PC starts. It remains calm for few hours, but then it eats up all the free RAM and a large portion of CPU juice.
Here, we are sharing some simple fixes to fix memory leak in Windows 10 due to high RAM and CPU usage issue:
How To Fix High RAM and CPU Usage of Windows 10 System (ntoskrnl.exe) Process?
Instead of changing any advanced system settings on your PC, make sure that your PC isn’t affected by some malware. Most of the users have upgraded their PCs from older Windows 7 and 8.1, thus, any malware in the previous OS gets migrated to Windows 10. You can install the anti-malware tools like MalwareBytes to deep scan your Windows 10 PC and take the first step in fixing Windows 10 high memory leakage. After the scan, reboot your PC. Now, move to the next solution to fix high RAM and CPU usage if this problem still persists.
How to Fix High RAM and CPU Usage of Windows 10:
1. Registry Hack:
- Hit Win Key + R
- Type in “Regedit” and then hit Enter.
- Go to ‘HKEY_LOCAL_MACHINE\SYSTEM\CurrentControlSet\Control\Session Manager\Memory Management’
- Find ‘ClearPageFileAtShutDown’ and change its value to 1
- Restart the computer
2. Fix the driver issue:
- Open ‘Device manager’ and ‘Scan for hardware changes’
3. Adjust your Windows 10 for the best performance
- Right click on “Computer” icon and select “Properties”
- Select “Advanced System settings”
- Go to the “System properties”
- Select “Settings”
- Choose “Adjust for best performance” and “Apply”.
- Click “OK” and Restart your computer.
4. Disable startup programs
- Hit Win Key + R
- Type ‘msconfig’ and press enter
- The Task manager window will open. Click on the “Startup” tab and you will see a list of programs that run at startup.
- Right click on the applications that you don’t want to run at startup and select “Disable”.
5. Defragment Hard DrivesHit Win Key + R
- Hit Win Key + R
- Type “dfrgui” and press enter
- In the new window click on the hard drives you want to defragment (Prefer the drive in which Windows is installed)
- Click “Optimize” and follow the instructions on the screen to finish the defragment process.
- Restart your computer.
6. Close and uninstall as many unwanted preinstalled applications as many you can. Here are the steps on How To Remove Pre-installed And Suggested Apps In Windows 10
The above steps should be sufficient to solve the high CPU uses problem in Windows 10 along with High RAM uses in Windows 10. Below are the steps on containing memory leak and High CPU/ RAM problem due to ntoskrnl.exe process.
Tuesday 18 July 2017
xD XSplit Broadcaster 2.7.1602.2231 incl Crack Download
xD XSplit Broadcaster 2.7.1602.2231 incl Crack Download Links ! Download XSplit Broadcaster 2.7.1602.2231 Cracked.zip / Link 2 / Alternate Link / Mirror Links Size : 125 MB
Software was copied from PirateCity.NET original article link = https://www.piratecity.net/xsplit-broadcaster-2-7-cracked/
Copyright © PirateCity.NET
https://www.piratecity.net/xsplit-broadcaster-2-7-cracked/
Software was copied from PirateCity.NET original article link = https://www.piratecity.net/xsplit-broadcaster-2-7-cracked/
Copyright © PirateCity.NET
https://www.piratecity.net/xsplit-broadcaster-2-7-cracked/
How to calculate Windows 10 Virtual Memory / Pagefile
Memory (RAM) and Virtual Memory. All programs use RAM, but when there isn't enough RAM for the program you're trying to run, Windows temporarily moves information that would normally be stored in RAM to a file on your hard disk called a Paging File. The amount of information temporarily stored in a paging file is also referred to as virtual memory. Using virtual memory, in other words, moving information to and from the paging file, frees up enough RAM for programs to run correctly.
The more RAM your computer has, the faster your programs will generally run. If a lack of RAM is slowing your computer, you might be tempted to increase virtual memory to compensate. However, your computer can read data from RAM much more quickly than from a hard disk, so adding RAM is a better solution.
The more RAM your computer has, the faster your programs will generally run. If a lack of RAM is slowing your computer, you might be tempted to increase virtual memory to compensate. However, your computer can read data from RAM much more quickly than from a hard disk, so adding RAM is a better solution.
If you receive error messages that warn of low virtual memory, you need to either add more RAM or increase the size of your paging file so that you can run the program on your computer. Windows usually manages this automatically, but you can manually change the size of virtual memory if the default size isn't large enough for your needs.
How to calculate Windows 10 Virtual Memory / Pagefile
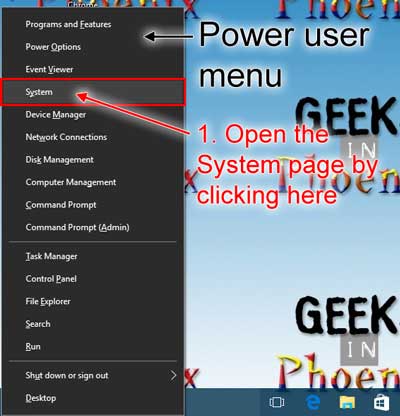
- Bring up the System page by either:
- Pressing the Windows logo key
 + Pause
- Pressing the Windows logo key + X to bring up the Power User menu and press Y to select System
- Right-clicking on the Windows logo on the Start menuto bring up the Power User menu and select System
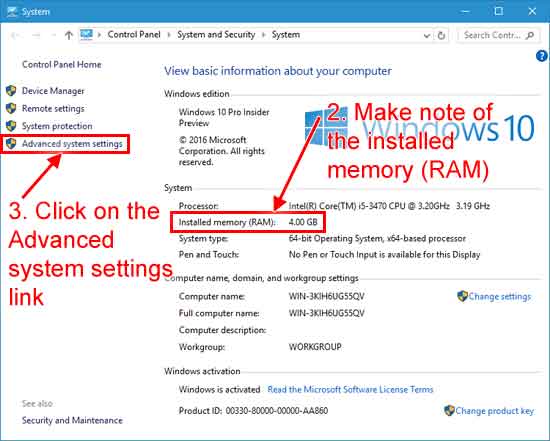
- Make note of the installed memory (RAM)
- Click on the Advanced system settings link
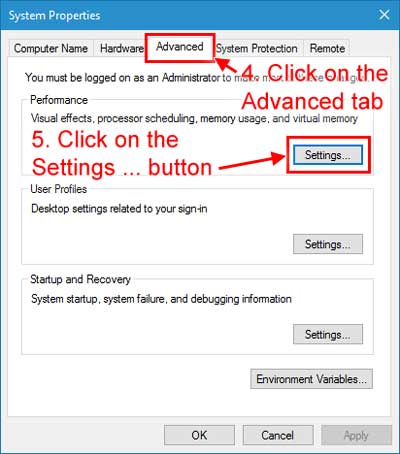
- Click on the Advanced tab of the System Propertiesdialog box
- Click on the Settings ... button in the Performancesection
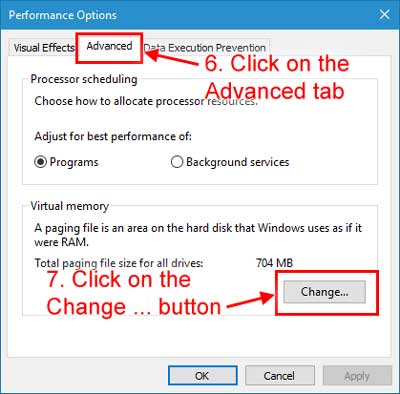
- Click on the Advanced tab of the Performance Optionsdialog box
- Click on the Change ... button inside of the Virtual memory section
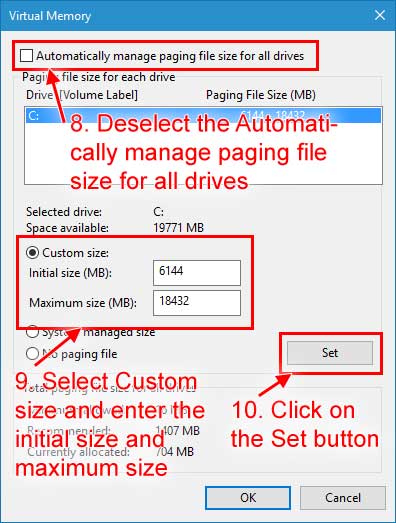
- Deselect the Automatically manage paging file size for all drives check box
- Select Custom size and enter the initial size and maximum size using the calculation shown above
- Click on the Set button
There is a formula for calculating the correct pagefile size. Initial size is one and a half (1.5) x the amount of total system memory. Maximum size is three (3) x the initial size. So let's say you have 4 GB (1 GB = 1,024 MB x 4 = 4,096 MB) of memory. The initial size would be 1.5 x 4,096 = 6,144 MB and the maximum size would be 3 x 6,144 = 18,432 MB.
All the information and links you will need are going to be on the System page.
Increase the RAM speed in windows 10Full Explained Fast Video in 2steps
https://www.youtube.com/edit?o=U&video_id=h1TNAuCdHjE

Monday 17 July 2017


Subscribe to:
Posts (Atom)